Wednesday, 6 March 2019

Cara mengganti Template atau tampilan Blogger dengan cepat

Cara mengganti Template atau tampilan Blogger dengan cepat


Langsung aja gk usa ulur2 cerita kaya apa aja

Pertama Login ke akun blogger anda mengunakan Gmail
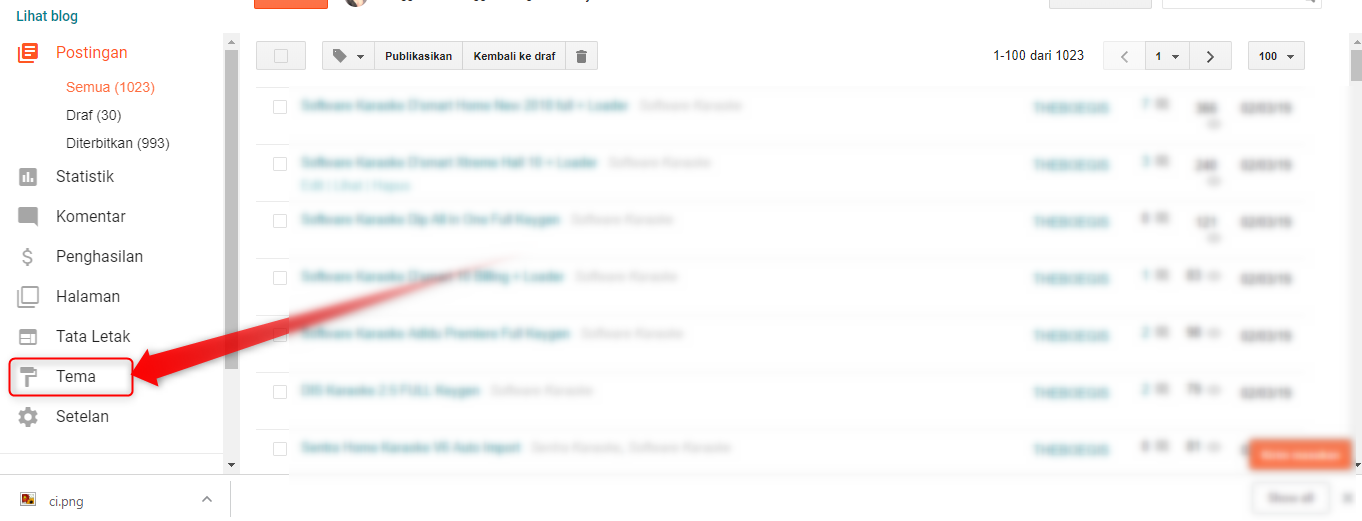
Setelah masuk langsung Klik /buka Tulisan Tema
Seperti Gambar dibawah :

Metode ganti Template ada dua cara disini kita akan bahas semua dengan lengkap tampa da sisia di pyrex ,  yang sobat harus sediakan adalah Template hasil download  jika sobat blompunya sobat dapat Download Template DISINI ( premium loh tapi gratis buat sobat)
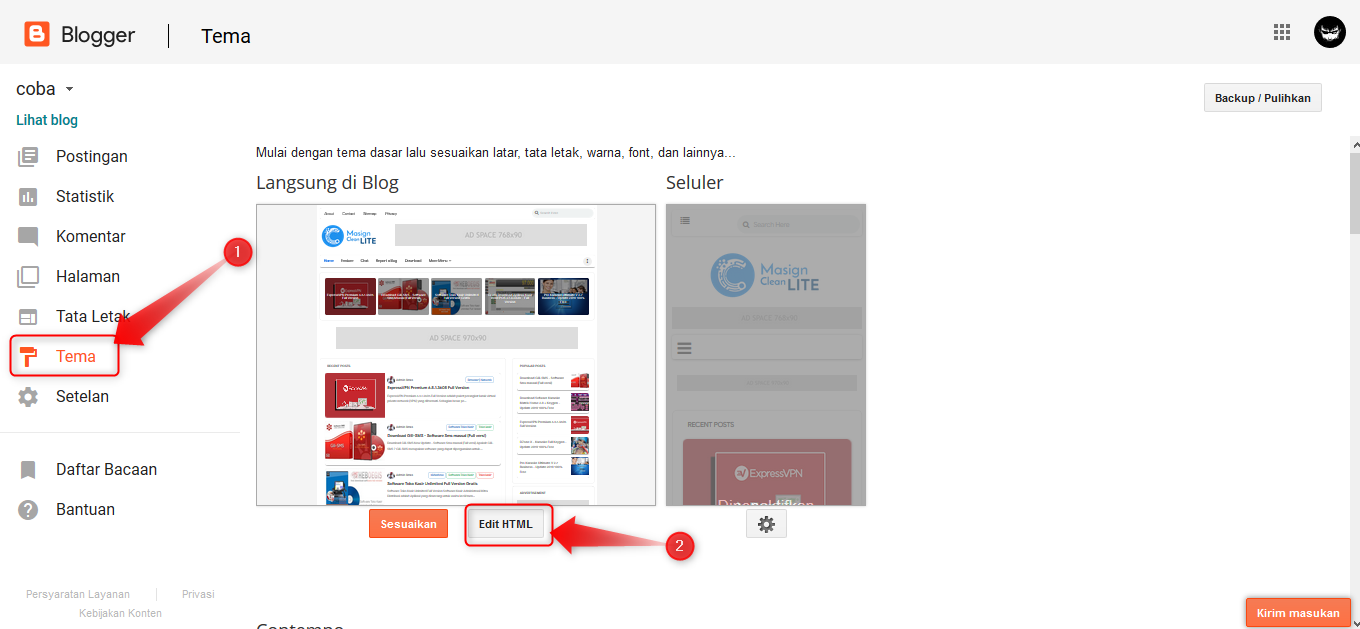
yg pertama dibahas ganti Template Blogger dengan Edit HTML dengan cara pertama seperti diatas
Kemudian Klik Tombol Edit HTML akan nampak seperti gambar di bawah :
Pertama

Kedua
Hapus semua isi Edit HTML dengan cara cepat tekan tombol laptop atau pc anda  Ctrl + A lalu setela tertandai semua klik tombol Delete.... supaya jelas liat gambar

Setelah  sobat kosongkan ruang Edit HTML  sobat buka folder template sobat dimana sobat simpan , dan buka  xml  dengan Notepad!!  Trus tandai semua Template Tersebut Dengan Cara Ctrl + A ,, setelah itu Copy semua isi xml tersebut  dan pastekan di ruang Edit HTML , yg kosong tadi . nah sebagai rasa simpati saya kesobat yg masih  baru  silahkan sobat liat Gambar
Gambar 1

Gambar 2

Gambar 3

Gambar 4

Gambar 5

Gambar 6
Setelah sobat lakukan seperti gambar diatas sobat tinggal klik tombol Simpan Tema selesai ok ... liat gambar supaya jelas

Sudah liat hasil nya  tema blog sobat berubah
Nah untuk cara kedua ini agak simpel tapi biasanya kagak rapi seperti cara pertama tapi mau di apa harus di bahas  ok langsung aja .. Cara pertama seperti langkah di awal masuk ke akun blogger sobat dengan gmail.. trus setelah masuk klik Tema seperti gambar di bawah
Setelah itu  klik tombol Backup/pulihkan pada samping kanan blogger.. next jika sobat ingi Membackup tampilan sobat silahkan klik tombol download tema

Jika sudah waktunya upload tema dari komputer dengan cara klik tombol Telusuri... Pilih folder dima template sobat simpan dan Klik open setelah itu klik tombol upload


Pabila Sobat sudah lakuka seperti diatas  dan ingin melihat perubahan nya silahkan Klik Lihat Blog
Bagai Mana Berubahkan ?  Ok sikian dan terimakasih 

Oiya Untuk Download Template  Bisa Sobat Cari di blog ini atau Klik Tombol DISINI

Next Tutorial : Cara Mengisi Top menu dan Nav Menu pada Tampilan Template Blogger terbaru 2019

Monday, 25 February 2019

Cara Cepat Membuat Blog Dalam Hitungan Menit

Cara Cepat Membuat Blog Dalam Hitungan Menit

Langsung aja kagak usa banyak lika liku cerita ahirnya orang gk paham .. ok ini dia cara daftar dan membuat blog dalam hitugan menit
yang perlu di sipakan  :
Jarigan internet
Kopi Susu kalu perlu kopinya di gela susunya pegang aja !!
Akun google
daftar dan buat Blogger
login ke akun google / gmail.com atau langsung masuk Blogger.com jika sudah logi di gmail
Setalah buka blogger.com akan penampkan seperti di gambar di bawah ini :

Nah Silahkan Klik masuk Atau Buat Blog Seperti gambar di atas
Setelah anda mengklik Tombol Masuk atau Tombol Buat Blog anda Akan disarankan Membuat nama tampilan , isi kolom dengan nama yg ada sukai  contoh seperti gambar di bawah :
Setelah Menulis nama tampilan anda klik tombol Lanjutkan Ke Blogger
Ok.. Jika sudah  anda akan menuju ke halaman dasbor blogger . dan silahkan klik buat blog baru  seperti pada gambar di bawah ok..
Jika sudah klik tombol buat blog baru  Silahkan isi
Judul : Judul Blog Anda
Alamat : url / atau alamat link blog anda
Setelah itu liat tanda jika di setujui akan berwarna biru telor asin ? jika tidak tersedi akan berwarna kuning telor asin  ?
Untuk lebih jellas nya lihat Contoh seperti gambar di bawah :
Setelah anda isi semua kolom dan alamat blog anda tersedia silahkan Klik tombol Buat Blog

Jika sudah Klik tombol Buat Blog anda akan Mendapat Pesan Apakah anda mau beli domain atau kagak mau ? untuk lebih jelas nya lait SS nya
Setelah anda Pilih salasatu dri tombol di atas  anda akan berjumpa dengan bapak Google hehehe...  tadaa.... selamat Blog anda sudah jadi !!! Tinggal membuat posting dan mempulik nya.  Lihat  gambar di bawah
Untuk melihat Blog Anda.  Silahkan Klik Tombol lihat Blog 
Udah Kelar jadi deh Blog nya  
Jika blom puas anda bisa baca disini :
Cara Mengganti Tampilan Blog atau Cara mengganti Template Blog Lebih Keren daripada Sebelumnya

Saturday, 23 February 2019

Membuat Gambar Utama Postingan Dengan Info dan Share Post

Membuat Gambar Utama Postingan Dengan Info dan Share Post

Untuk mengikuti tutorial ini, pastikan gambar utama pada blog sobat asli upload melalui blogger, dan gambar utama tidak boleh di dalam table maupun caption, jika gambar utama pada postingan sobat hasil copy paste atau di dalam table maka gambar utama yang asli tidak akan hilang dan hasilnya gambar menjadi double.
 Ikuti tutorial di bawah ini untuk memasang gambar utama postingan yang menarik.

Masuk ke Blogger > Tema > Edit HTML

Letakan CSS berikut ini tepat di atas kode ]]></b:skin> atau </style>
/* CSS First Image, Post Info and Share */
#first-blanter{background:#fff;box-shadow:0 2px 13px rgba(0,0,0,.1);border-radius:10px;overflow:hidden;position:relative;padding-bottom:60px;margin-bottom:20px}
img.first-image{width:100%;height:auto;max-height:480px}
.card-author.vcard{position:absolute;bottom:-10px;left:40px;z-index:9;font-size:13px}
img.photo-wrap{width:70px;height:70px;border-radius:100%;float:left;border:4px solid #fff;margin-right:15px}
.card-author a{line-height:9!important;font-weight:700;color:#222}
.card-time{position:absolute;top:15px;right:15px;background:#5d5d5d;color:#fff;line-height:1.8;font-size:13px;padding:5px 10px;margin-right:10px;margin-top:10px;border-radius:5px}
.card-time abbr{color:#fff;text-transform:none;font-style:none;text-decoration:none!important;border-bottom:0!important}
#card-share{position:absolute;right:14px;bottom:17px;margin:2px;padding:0;overflow:hidden}
#card-share a{position:relative;float:left;border-radius:2.5px;display:block;padding:3.5px 14px 7.5px;margin:0 5px;width:20px;height:20px}
#card-share a:hover{-webkit-filter:opacity(85%)}
.icon-facebook-d,.icon-twitter-d,.icon-wa-d{width:15px;height:15px;vertical-align:middle;margin-left:2px;margin-bottom:4px}
.icon-google-d{width:20px;height:20px;vertical-align:middle;margin-left:1px;margin-bottom:-2px}
.icon-pin-d,.icon-em-d{width:18px;height:18px;vertical-align:middle;margin-bottom:4px}
#card-share a.pt{display:none}
#share-wrapper{margin:auto;padding:0;margin-top:27px}
.shareyes-a{margin:-10px 0 12px;display:none}
.shareyes{display:none;position:relative;margin:0 0 -8px}
a.fb{background:#3b5998}
a.tw{background:#55acee;margin-left:2.5%}
a.em{background:#5a2472;margin-left:2.5%}
a.ln{background:#00c300;margin-left:2.5%}
a.wa{background:#4dc247;margin-left:2.5%}
a.pt{background:#bd081c;margin-left:2.5%}
a.fb-a{background:#3b5998}
.icon-facebook,.icon-twitter,.icon-pin,.icon-in,.icon-wa,.icon-em{width:16px;height:16px;vertical-align:middle}
.icon-google{width:21.5x;height:21.5px;vertical-align:middle}
.icon-bm{width:19px;height:19px;vertical-align:middle}
.icon-tr{width:15px;height:15px;vertical-align:middle}
.icon-facebook{margin-left:-2px}
@media screen and (max-width:768px){
#card-share{bottom:10px;right:2px;margin:7px}
#card-share a{text-align:center}
.card-time{font-size:11px}
}
@media screen and (max-width:680px){
#first-blanter{padding-bottom:100px;width:100%}
#card-share{bottom:10px;width:100%;right:2px;left:20px}
#card-share a{width:14%;text-align:center}
.card-author.vcard{bottom:25px}
}
@media screen and (max-width:480px){#card-share a{width:11.4%}}
@media screen and (max-width:380px){#card-share a{width:10%}}

letakan Javascript di bawah ini tepat di atas kode </body>
<script type='text/javascript'>
//<![CDATA[
$(function(){$(".separator:first").remove(),$(".post-body > img:first").remove()});
//]]>
</script>

Terakhir Letakan HTML di bawah ini, tepat di atas kode <data:post.body/> (kode tersebut ada lebih dari satu, pastikan coba satu-persatu dan test untuk mengetahui muncul atau tidaknya)
Biasa Nya terletak di  atas tombol Share This 
<div id='first-blanter'>
<img class='first-image' expr:alt='data:post.title' expr:src='resizeImage(data:post.thumbnailUrl,600)' expr:title='data:post.title'/>
<div class='card-author vcard'>
<b:if cond='data:top.showAuthor'>
<b:if cond='data:post.authorProfileUrl'>
<div class='fn' itemprop='author' itemscope='itemscope' itemtype='https://schema.org/Person'>
<img class='photo-wrap' expr:src='resizeImage(data:post.authorPhoto.url,100)' itemprop='image'/>
Posted by <a expr:href='data:post.authorProfileUrl' itemprop='url' rel='author' title='author profile'>
<span itemprop='name'><data:post.author/></span></a>
</div><b:else/><span class='fn' itemprop='name'><data:post.author/></span></b:if></b:if></div>
<div class='card-time'>
<abbr class='published updated timeago' expr:title='data:post.timestampISO8601' itemprop='datePublished dateModified'><data:post.dateHeader/></abbr>
</div>
<div id='card-share'>
<a class='fb' expr:href='&quot;https://www.facebook.com/sharer.php?u=&quot; + data:blog.url' target='_blank' rel='nofollow' title='Share to Facebook'><svg class='icons icon-facebook-d' viewBox='0 0 24 24'><path d='M9 8h-3v4h3v12h5v-12h3.642l.358-4h-4v-1.667c0-.955.192-1.333 1.115-1.333h2.885v-5h-3.808c-3.596 0-5.192 1.583-5.192 4.615v3.385z' fill='#fff'/></svg></a>
<a class='tw' expr:href='&quot;https://twitter.com/share?url=&quot; + data:post.url' target='_blank' rel='nofollow' title='Share to Twitter'><svg class='icons icon-twitter-d' viewBox='0 0 24 24'><path d='M24 4.557c-.883.392-1.832.656-2.828.775 1.017-.609 1.798-1.574 2.165-2.724-.951.564-2.005.974-3.127 1.195-.897-.957-2.178-1.555-3.594-1.555-3.179 0-5.515 2.966-4.797 6.045-4.091-.205-7.719-2.165-10.148-5.144-1.29 2.213-.669 5.108 1.523 6.574-.806-.026-1.566-.247-2.229-.616-.054 2.281 1.581 4.415 3.949 4.89-.693.188-1.452.232-2.224.084.626 1.956 2.444 3.379 4.6 3.419-2.07 1.623-4.678 2.348-7.29 2.04 2.179 1.397 4.768 2.212 7.548 2.212 9.142 0 14.307-7.721 13.995-14.646.962-.695 1.797-1.562 2.457-2.549z' fill='#fff'/></svg></a>
<a class='pt' expr:href='&quot;https://pinterest.com/pin/create/button/?url=&quot; + data:post.url + &quot;&amp;amp;media=&quot; + data:post.thumbnailUrl + &quot;&amp;amp;description= + data:post.title&quot;' target='_blank' title='Share to Pinterest'><svg class='icons icon-pin-d' viewBox='0 0 24 24'><path d='M13.25,17.25C12.25,17.25 11.29,16.82 10.6,16.1L9.41,20.1L9.33,20.36L9.29,20.34C9.04,20.75 8.61,21 8.12,21C7.37,21 6.75,20.38 6.75,19.62C6.75,19.56 6.76,19.5 6.77,19.44L6.75,19.43L6.81,19.21L9.12,12.26C9.12,12.26 8.87,11.5 8.87,10.42C8.87,8.27 10.03,7.62 10.95,7.62C11.88,7.62 12.73,7.95 12.73,9.26C12.73,10.94 11.61,11.8 11.61,13C11.61,13.94 12.37,14.69 13.29,14.69C16.21,14.69 17.25,12.5 17.25,10.44C17.25,7.71 14.89,5.5 12,5.5C9.1,5.5 6.75,7.71 6.75,10.44C6.75,11.28 7,12.12 7.43,12.85C7.54,13.05 7.6,13.27 7.6,13.5A1.25,1.25 0 0,1 6.35,14.75C5.91,14.75 5.5,14.5 5.27,14.13C4.6,13 4.25,11.73 4.25,10.44C4.25,6.33 7.73,3 12,3C16.27,3 19.75,6.33 19.75,10.44C19.75,13.72 17.71,17.25 13.25,17.25Z' fill='#fff'/></svg></a><a class='em' expr:href='&quot;https://www.blogger.com/share-post.g?blogID=&quot; + data:blog.blogId + &quot;&amp;postID=&quot; + data:post.id + &quot;&amp;target=email&quot;' onclick='window.open(this.href,&quot;popupwindow&quot;,&quot;status=0,height=500,width=500,resizable=0,top=50,left=100&quot;);return false;' rel='nofollow' target='_blank' title='Share to Email'><svg class='icons icon-em-d' viewBox='0 0 24 24'><path d='M12,13L2,6.76V6C2,4.89 2.89,4 4,4H20A2,2 0 0,1 22,6V6.75L12,13M22,18A2,2 0 0,1 20,20H4C2.89,20 2,19.1 2,18V9.11L4,10.36V18H20V10.36L22,9.11V18Z' fill='#fff'/></svg></a>
<a class='wa' data-action='share/whatsapp/share' expr:href='&quot;https://api.whatsapp.com/send?text=&quot; + data:post.title + &quot; &quot; + data:post.url' title='Share to Whatsapp' target='_blank'><svg class='icons icon-wa-d' viewBox='0 0 24 24'><path d='M.057 24l1.687-6.163c-1.041-1.804-1.588-3.849-1.587-5.946.003-6.556 5.338-11.891 11.893-11.891 3.181.001 6.167 1.24 8.413 3.488 2.245 2.248 3.481 5.236 3.48 8.414-.003 6.557-5.338 11.892-11.893 11.892-1.99-.001-3.951-.5-5.688-1.448l-6.305 1.654zm6.597-3.807c1.676.995 3.276 1.591 5.392 1.592 5.448 0 9.886-4.434 9.889-9.885.002-5.462-4.415-9.89-9.881-9.892-5.452 0-9.887 4.434-9.889 9.884-.001 2.225.651 3.891 1.746 5.634l-.999 3.648 3.742-.981zm11.387-5.464c-.074-.124-.272-.198-.57-.347-.297-.149-1.758-.868-2.031-.967-.272-.099-.47-.149-.669.149-.198.297-.768.967-.941 1.165-.173.198-.347.223-.644.074-.297-.149-1.255-.462-2.39-1.475-.883-.788-1.48-1.761-1.653-2.059-.173-.297-.018-.458.13-.606.134-.133.297-.347.446-.521.151-.172.2-.296.3-.495.099-.198.05-.372-.025-.521-.075-.148-.669-1.611-.916-2.206-.242-.579-.487-.501-.669-.51l-.57-.01c-.198 0-.52.074-.792.372s-1.04 1.016-1.04 2.479 1.065 2.876 1.213 3.074c.149.198 2.095 3.2 5.076 4.487.709.306 1.263.489 1.694.626.712.226 1.36.194 1.872.118.571-.085 1.758-.719 2.006-1.413.248-.695.248-1.29.173-1.414z' fill='#fff'/></svg></a>
</div>
</div>

Simpan Template. dan hasil nya Hasil Nya :

Saturday, 13 October 2018

How to Make a Sitemap with the Timeline Style

How to Make a Sitemap with the Timeline Style

This time Wiendhy Stres will discuss and explain how the ways or steps you can follow and do in How to Make a Sitemap with the Timeline Style .
The creation of a sitemap aims to simplify visitor navigation in tracing posts in a blog. In addition, the sitemap also allows search engine crawler robots to explore blogs. Blogs will be judged to be more structured if they have a special sitemap page.

How to Make a Sitemap with the Timeline Style

Okay, just go ahead and follow the steps below 

Open your Blogger page , click the Theme menu , click the Edit HTML button and add this code before </head>

<b:if cond='data:blog.pageType == &quot;static_page&quot;'>
<style type='text/css'>
*,*:before,*:after{-webkit-box-sizing:border-box;-moz-box-sizing:border-box;box-sizing:border-box}
.namina-sitemap{position:relative;margin:30px auto}
.namina-toc-wrap{display:inline-block;width:100%}
.namina-toc-wrap .namina-cat{background:#fff;border-radius:2px;color:#333;font-size:15px;font-weight:700;padding:10px 20px;border:4px solid #333;text-transform:capitalize}
.namina-toc::before{background:#333;bottom:0;content:&quot;&quot;;left:20%;margin-left:-10px;position:absolute;top:0;width:4px}
.namina-toc{margin:0;padding:30px 20px;position:relative}
.namina-sitemap ul.namina-toc{margin:0;padding:30px 0;list-style-type:none}
.namina-toc li{list-style:none;margin:0;padding:0;position:relative}
.namina-toc &gt; li .toc-date{color:#999;display:block;font-size:14px;font-weight:bold;position:absolute;text-transform:uppercase;top:25px;width:15%}
.namina-toc &gt; li .namina-icon{background:#fff;border-radius:50%;box-shadow:0 0 0 4px #333;color:#fff;font-size:1.4em;font-style:normal;font-variant:normal;font-weight:normal;height:10px;left:22%;line-height:10px;margin:0 0 0 -25px;position:absolute;text-align:center;text-transform:none;top:30px;width:10px}
.namina-toc &gt; li .namina-post::after{border-color:transparent #f5f5f5 transparent transparent;border-style:solid;border-width:10px;content:&quot;&quot;;height:0;pointer-events:none;position:absolute;right:100%;top:auto;width:0}
.namina-toc &gt; li .namina-post{background:#f5f5f5;border-radius:5px;display:block;font-size:15px;margin:0 0 15px 23%;padding:25px 30px;position:relative}
.namina-toc &gt; li .namina-post a{color:#333;font-weight:700}
.namina-toc &gt; li:last-child .namina-post{margin:0 0 0 23%}
.namina-toc &gt; li .namina-post a:hover{color:#999}
</style>
<script type='text/javascript'>
/*<![CDATA[*/
$(document).ready(function(){var static_page_text=$.trim($(".post-body").text());var text_month=[,"Jan","Feb","Mar","Apr","May","Jun","Jul","Aug","Sept","Oct","Nov","Dec"];if(static_page_text==="[sitemap]"){var postbody=$(".post-body");$.ajax({url:"/feeds/posts/default?alt=json-in-script",type:"get",dataType:"jsonp",success:function(e){var t=[];for(var n=0;n<e.feed.category.length;n++){t.push(e.feed.category[n].term)}var t=t.join("/");postbody.html('<div class="namina-sitemap"></div>');$(".post-body .namina-sitemap").text(t);var r=$(".namina-sitemap").text().split("/");var i="";for(get=0;get<r.length;++get){i+="<span>"+r[get]+"</span>"}$(".namina-sitemap").html(i);$(".namina-sitemap span").each(function(){var e=$(this);var t=$(this).text();$.ajax({url:"/feeds/posts/default/-/"+t+"?alt=json-in-script",type:"get",dataType:"jsonp",success:function(n){var r="";var i='<ul class="namina-toc">';for(var s=0;s<n.feed.entry.length;s++){for(var o=0;o<n.feed.entry[s].link.length;o++){if(n.feed.entry[s].link[o].rel=="alternate"){r=n.feed.entry[s].link[o].href;break}}var u=n.feed.entry[s].title.$t;var a=n.feed.entry[s].published.$t,f=a.substring(0,4),l=a.substring(5,7),c=a.substring(8,10),h='<span class="day">'+c.replace(/^0+/,"")+'</span><span class="month">'+text_month[parseInt(l,10)]+' </span><span class="year">'+f+"</span>";i+='<li><div class="toc-date">'+h+'</div><div class="namina-icon"></div><span class="namina-post"><a href="'+r+'">'+u+"</a></span></li>"}i+="</ul>";e.replaceWith('<div class="namina-toc-wrap"><div class="namina-cat">'+t+'</div>'+i+"</div>")}})})}})}});
/*]]>*/
</script>
</b:if>

When finished, click the Save theme button.

Then select the Page menu then click the new Page button

After that, click the HTML button then add the caller code below in HTML


[sitemap]

Then click Publish and see the results


Now that's from Wiendhy Stres about how to make a sitemap with the timeline style . Sorry if there are deficiencies and hopefully useful for you.


Eliminating Blog Title on Google AdSense Matched Content

Eliminating Blog Title on Google AdSense Matched Content

Eliminating Blog Title on Google AdSense Matched Content
As we know, Matched Content is one of the features of Google AdSense that serves to display a row of related posts based on the label in the post. The way it works is more or less the same as the Related Post widget in Blogger that you normally see in the templates that add it.

On the Google AdSense dashboard you can create Matched Content ad units and can also be modified in the settings. But there are obstacles when it appears on your blog that the blog title also appears in the row of links that are displayed and it will be a little annoying because the link is longer.

The following is an example of the display of the Google AdSense Matched Content ad unit of the Wiendhy Stres blog.

The benefits of this ad unit for your blog are:

  • Increase Pageview on blogs
  • Increase readers who faithfully read your blog content
  • Will have a good impact on increasing advertising revenue

Eliminating Blog Title on Google AdSense Matched Content

At this time the Blogger Tips Wiendhy Stres will provide a solution on how to Eliminate Blog Title on Google AdSense Matched Content . For those who experience this problem, let's look at the method below.

Login to Blogger > Click the Theme menu and click the Edit HTML button > Search and delete the meta tag below

<meta expr:content='data:blog.pageTitle' property='og:title'/>

Change with the code below

<meta expr:content='data:blog.pageName' property='og:title'/>

Click the Save theme and finish button . Then check the changes on your blog. Easy enough isn't it? If there are still no changes, it usually takes time to remove the blog title on Matched Content. To adjust the appearance of Matched Content, you can visit this link .

For those of you who want to have the Latest Hosting Promo Code , please visit the Promo Hosting

from Wiendhy Stres about How to Eliminate Blog Title on Google AdSense Matched Content , hopefully it will be useful for your friends and greetings.

Monday, 17 September 2018

Overcoming the decrease in blog traffic due to the Google Core Algorithm

Overcoming the decrease in blog traffic due to the Google Core Algorithm

Overcoming the decrease in blog traffic due to the Google Core Algorithm
If you experience a decrease in traffic on your blog this week, one of the causes may be due to the effect of being affected by Google Core . Therefore, it's good for you to read more about the following Google Core Algorithm Update .


In some information yesterday, Google made sure it was updating the Google Core algorithm earlier this week.

Google has confirmed rumors that a search algorithm update took place a few days ago. The existence of the update algorithm does not inevitably make some sites may even increase rankings in search engines or vice versa, instead experiencing a decrease in traffic that clearly has a negative impact. 

You need to know, that basically Google always makes improvements in various lines. Every time Google updates, there will definitely be a positive and negative impact on one or more changes whose purpose is of course to increase results with a high level of relevance. 

Some are focused around certain improvements. In fact, when viewed from the impact it causes.

As I said above, this week, Google is releasing the Core algorithm update. Gradually, Google does it several times regularly every year. 

It was clearly confirmed by Google through posting on Twitter that it was releasing "Core algorithm update" since Monday. Scara clearly Google says it is "routine" updates throughout the year and is referenced to follow up on previous Core updates. 

Google also explained that the real impact of this annual Core search update caused some websites to be affected, whether deindex, or just a decrease in rankings. Last week Google's top ranking, this week could have been freefall.

In general, Google says to continue to improve the quality of your site as a whole, and the next time Google continues to strive to be consistent with this update. 

The following is Google's statement regarding the Google Core update that I have stated above:

On Monday, we released a broad core algorithm update, as we routinely sdo throughout the year. For background and advice about these, see our tweet from last month.
Like other update release events, some sites may experience adverse effects or profits. There is nothing wrong with the webpage that you have today. Please observe the changes and immediately make improvements.

Overcoming the decrease in blog traffic due to the Google Core Algorithm


The following are some tips to overcome the Google Core algorithm update:

  • Stay focused on fixing less good content
  • Make the content more fresh and have good quality
  • Avoid creating content with a small number of letter characters
  • Avoid black hat SEO
  • Remove low quality backlinks
  • Use responsive design / mobile friendly templates

Tips to overcome the Core Algorithm update above in accordance with what I understand, based on the nature of the initial purpose of the existence of the Google algorithm is made. If the tips are too simple, that's what I know. You can find other references. The more you read, the more benefits you will get. 

At least that's some summary. Overcoming the decrease in blog traffic due to the Google Core Algorithm . Hopefully useful and cautious.
How to Deal with Leverage Browser Caching on Blogger

How to Deal with Leverage Browser Caching on Blogger

How to Deal with Leverage Browser Caching on Blogger
The problem that often appears faced by bloggers is the speed of the site. the problem arises because of several things like optimize images, minify javascript and leverage browser caching. Now on this occasion Arlina Design will share how to overcome browser leverage caching on Blogger ?


This problem is often encountered when we check the speed of the blog through the GTMetrix or Google PageSpeed ​​Insights tool Because browser caching leverage is also one of the determinants of blog loading speed, the faster the blog loading, the higher the blog traffic. An example of leverage browser caching is like the picture below when I check the www.arlinadzgn.com site on Google PageSpeed ​​Insights
Simply put Leverage browser caching functions to set the expiration date or the maximum age of HTTP / HTTPS headers that are directly related to source code such as CSS, Javascript and static images. So instruct the browser to load the Source Code that has been downloaded earlier from local storage.

How to Deal with Leverage Browser Caching on Blogger


Step One, to overcome browser caching leverage, open the Blogger Dashboard then select Theme> Click the Edit HTML button and add the code below just below <head>

<include expiration='7d' path='*.css'/>
<include expiration='7d' path='*.js'/>
<include expiration='3d' path='*.gif'/>
<include expiration='3d' path='*.jpeg'/>
<include expiration='3d' path='*.jpg'/>
<include expiration='3d' path='*.png'/>

Once added, save the theme. 

For WordPress users, you can use this code. Access the .htaccess file on the Public Html WordPress web hosting and add the code below

## EXPIRES CACHING ##
<IfModule mod_expires.c>
ExpiresActive On
ExpiresByType image/jpg "access plus 1 year"
ExpiresByType image/jpeg "access plus 1 year"
ExpiresByType image/gif "access plus 1 year"
ExpiresByType image/png "access plus 1 year"
ExpiresByType text/css "access plus 1 month"
ExpiresByType application/pdf "access plus 1 month"
ExpiresByType text/x-javascript "access plus 1 month"
ExpiresByType application/x-shockwave-flash "access plus 1 month"
ExpiresByType image/x-icon "access plus 1 year"
ExpiresDefault "access plus 2 days"
</IfModule>
## EXPIRES CACHING ##

Usually takes approximately one week after installation, then check the site again at GTMetrix or Google PageSpeed ​​Insights
That is one way to speed up loading your blog, by having a good blog speed it will be able to add blog traffic. 

Thus, How to Overcome Browser Caching Leverage on Blogger, hopefully useful. Wassalam.